
In this blog post, we will show you a step-by-step guide on how to install and set up a MySQL server both manually on the Ubuntu 20.04 operating system, as well as by using ScaleGrid’s managed database service. In the following sections of this tutorial, we will help you through every step to successfully set up your very own MySQL server and configure it properly.
A bit about MySQL & Ubuntu
MySQL is an open-source relational database management system (DBMS). It runs on Windows and Linux Servers, and it is commonly installed as part of the LAMP stack (Linux, Apache, MySQL, PHP/Python/Perl) or the LEMP stack (Linux, Nginx, MySQL, PHP). It is an apt choice if you know that you simply need a database, as it is a fast, simple, and scalable SQL-based system and is considered the most popular relational database management system.
While Ubuntu is one of the world’s most popular open-source desktop OS, Ubuntu 20.04 comes with enterprise-class stability, resiliency and even better security in a cost-effective model.
How to Install MySQL on Ubuntu 20.04
Before we dive down into the process to install a MySQL server on Ubuntu, keep in mind of these prerequisites:
- An Ubuntu 20.04 server with a non-root administrative or sudo user to perform the authoritative steps and a UFW-configured firewall
- The system should be updated by using:
sudo apt updatesudo apt upgrade -y
- A steady network connection
Fresh Installation of MySQL on Ubuntu 20.04
Install MySQL
To install MySQL on Ubuntu 20.04, a simple command (apt install mysql server) can be executed as the installation package is part of the official Ubuntu 20.04 repository.
apt install mysql-server -y
Securing the MySQL server installation
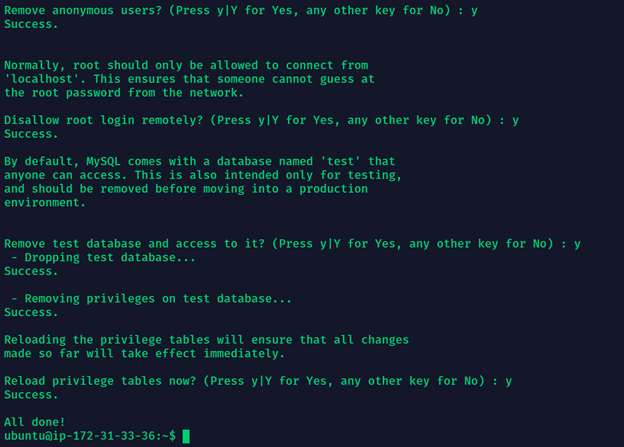
MySQL server has a pre-built script for its secure installation. As a common practice to make this a secure installation, run this script after the installation command. What it does is it lets the user set the root password for MySQL, disable the accessibility of the root account from outside the local host, remove anonymous user accounts and also remove test database which may be accessed by anonymous users. This script can be invoked with this sudo command:
sudo mysql_secure_installation
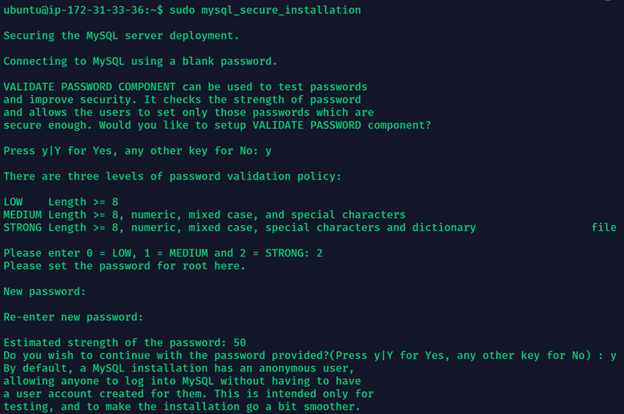
A series of prompts appears after running the secure installation script. The first prompt is to setup VALIDATE PASSWORD COMPONENT. This prompt (if selected) will perform validation upon the user’s password creation. It will only let you create the password if it matches the password standards on MySQL.
Setting up the root password
The following prompt is for setting up the password for root. The user should set this password. Answer all subsequent prompts as “Yes”, as this is a best practice from a security perspective.
Setting up SSL for the MySQL server installation
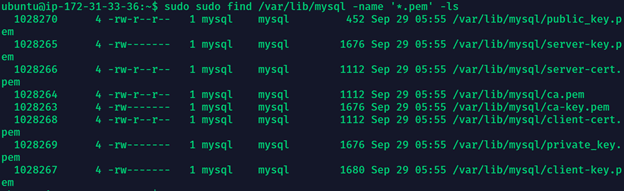
There are times after installing MySQL, when the database server is configured on a separate physical machine either on the same or a different network. To communicate with such a database, the communication needs to be secured and encrypted. Therefore, SSL certificates must be installed and enabled on the database server. The SSL protocol uses a pair of keys to authenticate, secure and manage secure connections. Use the following command to generate SSL keys:
sudo mysql_ssl_rsa_setup --uid=mysql
Their default directory contains these keys, and you can find them by invoking the following command:
sudo sudo find /var/lib/mysql -name '*.pem' -ls
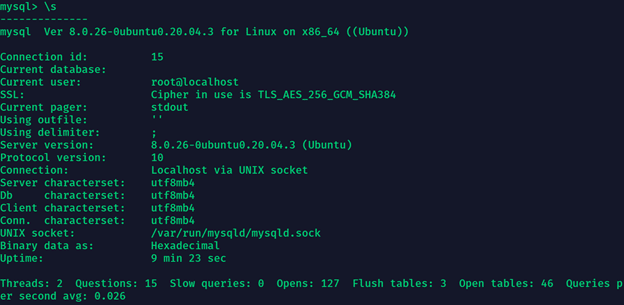
mysql> \s
By invoking the above command from within the SQL prompt, you can confirm that SSL is active by looking for the row that says SSL: Cipher in use is […], as seen in the image below.
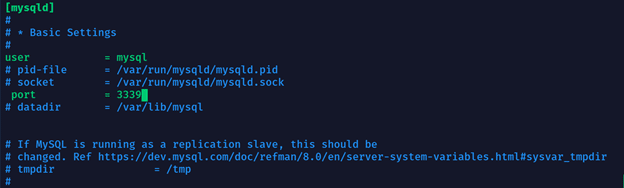
Securing your Database
Database security is one of the most critical elements to consider when planning to install MySQL. Attackers are always on the lookout for ways to gain backdoor entry into database systems and gain inside information about the target. Changing its default port is an easy way to increase the security of your database. This can be changed in the configuration file at /etc/mysql/mysql.conf.d/mysqld.cnf.
Create a MySQL User and Database
By using this simple command, you can create a MySQL database user account along with its password:
CREATE USER 'Username' @ 'localhost' IDENTIFIED BY 'StrongPassword';
The field localhost in the CREATE USER command indicates that the user will connect from the same server. It can be replaced by an IP address if you want to connect from a machine with a specific IP address, or it can be replaced by a percentage sign % if the user wants to access the DB from anywhere.
If you only want to create a database, it can be created by using the following command:
CREATE DATABASE databasename;

After you create the user and the database, the user will be granted the required permissions for the database.
Permissions can be of any type; for example, CREATE, ALTER, INSERT, UPDATE, DELETE, SELECT, RELOAD, etc. Usually, the owner of the database needs all the permission and these permissions can be assigned independently to a user. All of these permissions can be granted at once by using the command.
GRANT ALL PRIVILEGES ON databasename.tablename TO 'username' @ 'localhost';
Again, the localhost keyword can be replaced with an IP address or with the % sign, if the user intends to connect from a specific IP address or any other source.

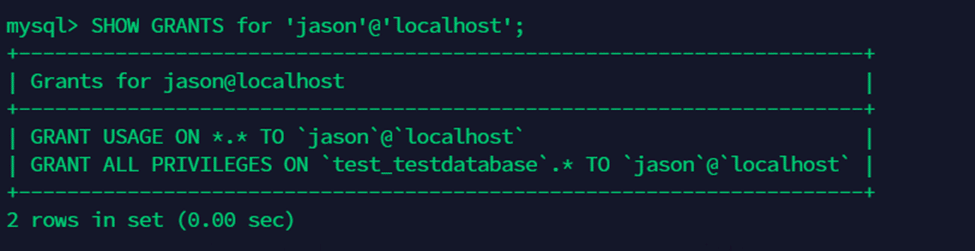
Privileges for a user can be seen via the SHOW GRANTS command
SHOW GRANTS for 'databaseuser'@'localhost';
All the privileges can be revoked for a user using the command:
REVOKE ALL PRIVILEGES ON database.name.* FROM 'database.user'@'localhost';
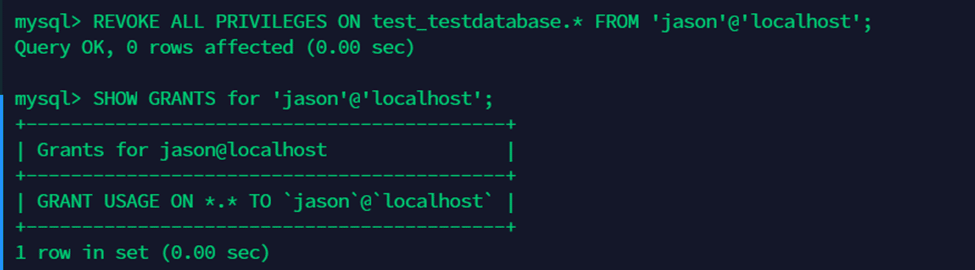
Here you can see that after running the REVOKE command, there are no privileges for the user jason.
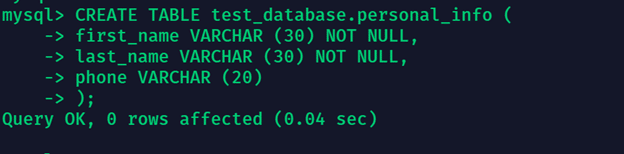
Creating and Deleting Tables
It’s easy to add or delete tables from your database. All you need to do is use one of the following commands:
DROP TABLE databasename.tablename
CREATE TABLE databasename.tablename ( column1 datatype,column2 datatype ,column3 datatype);
The column parameter specifies the name, while the datatype parameter specifies what type of data the column contains.
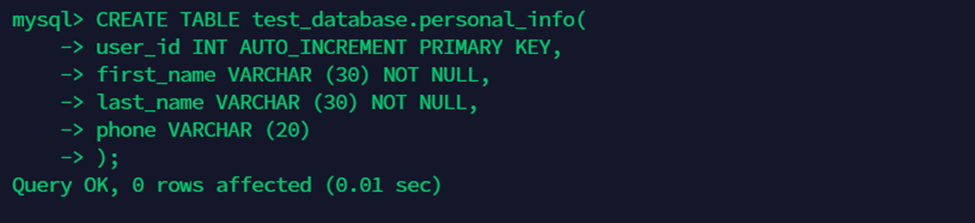
There are times when a primary key has to be added to a column. A primary key allows you to uniquely identify each entry in your table. This can be done by mentioning it in the CREATE TABLE command. The example below creates a column user_id with a primary key which is auto-incremented. Keep in mind that the primary key must contain unique values and cannot contain null values
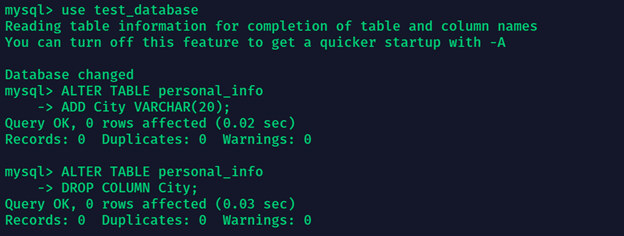
Add or Remove Columns in a Table
Columns can also be added or deleted from a specific table of a database after its creation.
To do that, change the database you want to alter by using the use database_name command.
Subsequently, the following commands will add and drop a column:
ALTER TABLE tablename ADD columnname datatype;
ALTER TABLE tablename DROP columnname;
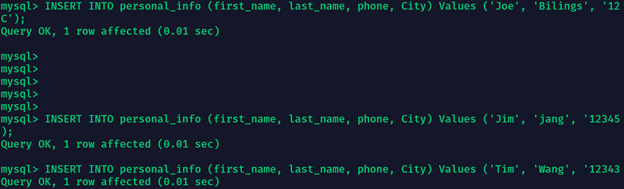
Insert Data in a Table
Insert data into a table by using the following command:
INSERT INTO tablename (column1,column2,column3) VALUES ('value1','value2','value3' );
You will need to specify the column names and the value to be inserted into each column in order. If you want to insert values to every column of a table, you can simply omit the columns and start specifying the values directly after the table name:
INSERT INTO tablename VALUES ('value1','value2','value3' );
Update Data in a Table
Use the following command to update the data in a table:
UPDATE tablename SET columnname= 'newvalue' WHERE columnname='value'
The WHERE condition tells in which row the data has to be updated. If the condition is not specified, then the data is updated in all the rows of the specified column.

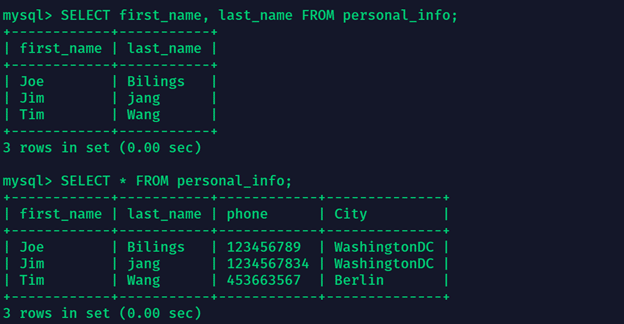
Select Data From a Table
To select and view data from particular columns in a table, use the following command:
SELECT column1,column2 FROM tablename;
However, to select all the columns from a table, the command used is:
SELECT * FROM tablename;
Enable Binary Logging
Enabling Binary Logging in the MySQL database server allows you to log the queries that have made changes in the database. Binary logging is a useful feature to have enabled if you for example need to troubleshoot a problem caused by a query in the database.
To enable binary logging, add the following line inside the configuration file at /etc/mysql/mysql.conf.d/mysqld.cnf.
log-bin=mysql-bin.log
To confirm if the binary logging is active, invoke the following command from the MySQL shell:
show variables like '% log_bin%'
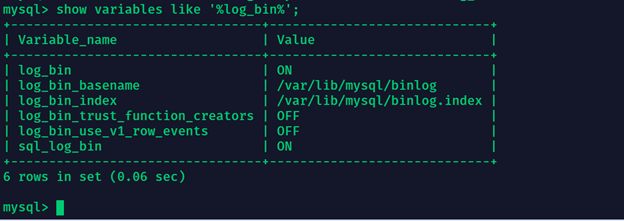
By default, binary log files are stored inside the /var/lib/mysql directory in most of the Linux distributions including Ubuntu.
Setup Simple Asynchronous Replication
MySQL has support for replication, which comes in handy when planning for disaster recovery and making sure you minimize the potential for any downtime. MySQL supports two types of replications:
- Semi-synchronous replication
- Asynchronous replication
With semi-synchronous replication, when a source commits a transaction, all replicas will also have committed the transaction before the source returns to the session that performed the transaction. The downside is that it causes a major delay in the transaction completion due to the aforementioned transaction system.
Whereas, with asynchronous replication, the source writes events to its binary log and replicas request them when they are ready. However there is no guarantee that any event will ever reach any replica.
By default, MySQL has asynchronous replication enabled due to its fast processing time. Still, the major drawback is if the source database fails, there is no way to retrieve data that hasn’t completed the transactions to replica DBs. On the other hand, semi-synchronous replication mode focuses more on data availability and durability but is very slow. Choosing a replication mode solely depends on user-specific needs around their database setup.
Inside the my.cnf file for the source server and the replica server, you can write the server IDs respectively as:
server_id=1
server_id=2
A dedicated MySQL user can be created on the source server, which will be used by the replica to connect to the source server.
GRANT REPLICATION SLAVE ON *.* TO ‘masterusername’ @ 'ipaddress of slave server'
→ IDENTIFIED BY ‘masterpassword’;
The replication process on the replica server can be started by:
mysql> CHANGE MASTER TO
-> MASTER_HOST='ip address',
-> MASTER_PORT=port number,
-> MASTER_USER='username',
-> MASTER_PASSWORD='password',
-> MASTER_LOG_FILE='',
-> MASTER_LOG_POS=4;
mysql> start slave;
These instructions will start creating the replica server as a copy of the source server.
Backup/Restore a MySQL Database
Keeping a backup of your database is always a good idea, you never know when you might need it to make sure critical data isn’t lost. To backup a database for MySQL on Ubuntu OS, simply execute the following mysqldump command:
sudo mysqldump -u root -p <database.name> > <filename.sql>

To restore a deleted database, the database is first created with the same name in MySQL. The database is then restored with the command:
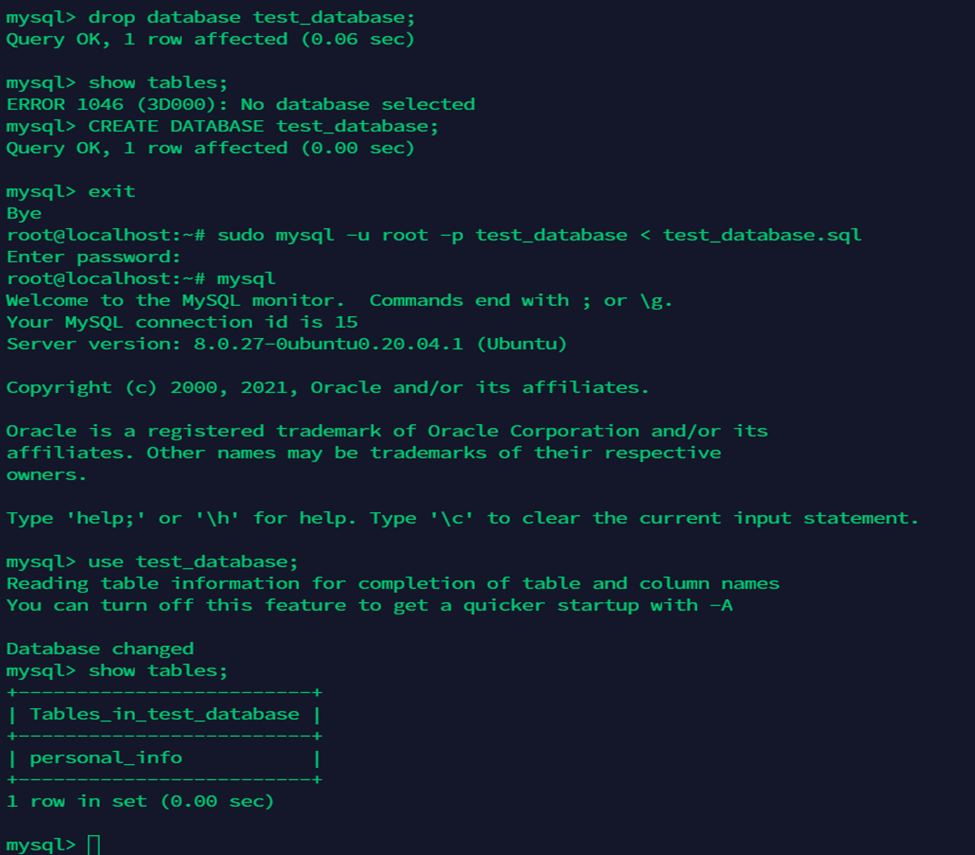
sudo mysql -u root -p <database.name> < <filename.sql>
The following screenshot first deletes our test_database, then recreates it and tries to restore all its data from the backup created earlier. Data importing can also be done by following the same process.
Wrapping up on installing MySQL on Ubuntu
You have now successfully completed the basic steps to install MySQL on Ubuntu 20.04. After completing the installation, you will have an operational relational database that you can use to build your next application or website.
If you’d rather have this whole process automated and managed by experts, check out the next portion of this guide.
Using ScaleGrid to Set Up your DigitalOcean MySQL Deployment
In this part of the guide, we are using our fully managed MySQL hosting solution, as it offers the highest throughput and lowest latency on DigitalOcean. Learn more in the Best MySQL DigitalOcean Performance article to compare ScaleGrid vs. DigitalOcean Managed Databases pricing, latency and throughput performance.
The entire process should take less than 20 minutes, with just a couple minutes at the beginning to customize your MySQL deployment configuration, and a couple minutes at the end to connect to your application.
After signing up for a free trial account, the first thing you’ll do is select MySQL as your database, DigitalOcean as your cloud, and Dedicated Hosting as your plan to initiate the cluster creation process:
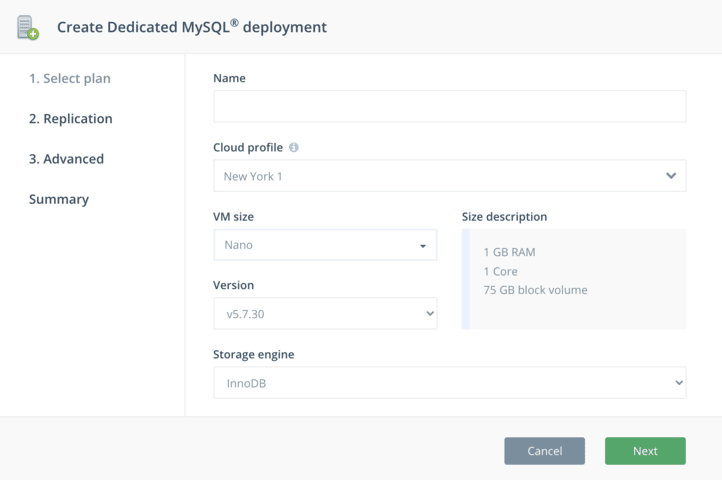
Step 1. Enter MySQL Deployment Details
The cluster creation wizard will open to the first step where you can customize the basic details of your deployment. Enter a name for your cluster using alphanumerics, and use a unique, descriptive name so you can easily recognize your cluster later on.
Next, select the DigitalOcean data center you’d like to use for your master server from the cloud region dropdown – we recommend using the same region as your applications DigitalOcean Droplets for the best performance. Then you can select your VM size of DigitalOcean Droplet instances, and the version of MySQL you wish to use (all major versions supported). InnoDB Storage Engine is the default for all MySQL deployments. Click next.
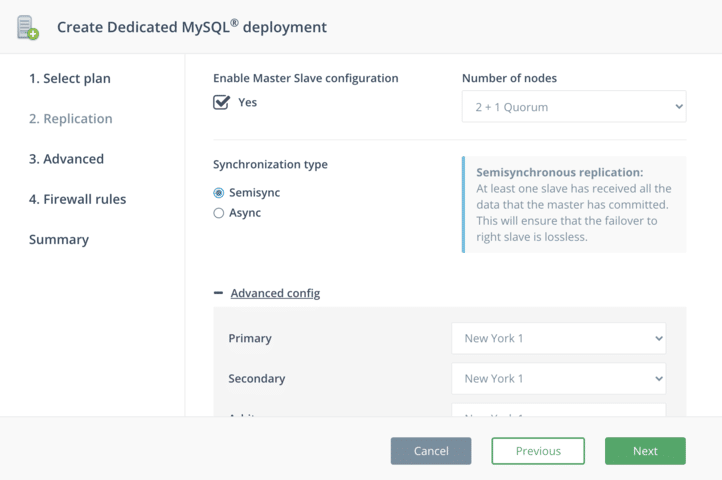
Step 2. Enable Master-Slave Replication
In step 2, you can enable DigitalOcean MySQL master-slave replication to add high availability to your deployment. Replication is important for keeping your application available and online for your users in the event your DigitalOcean data center region goes down. While DigitalOcean is a highly reliable cloud provider with 99.99% uptime, data centers inevitably go down, so replicating your data to additional data center locations allows you to minimize the risk of data loss and downtime for your users.
If you want to continue with a standalone deployment, click next to move onto step 3 without enabling master-slave configuration.
Note – master-slave configuration is only available for paid accounts, you cannot set up a replica set deployment while you are in trial mode.
Configure the MySQL Master-Slave setup
There are a couple options here to customize your MySQL master-slave setup. First, you can choose between 2 + 1 Quorum or 3 nodes for your deployment. Both offer high availability, but in the 2 + 1 Quorum setup, you have only 2 data-bearing nodes as the Quorum node serves as a decision-maker in a failover event. You can also contact support to customize your master-slave configuration to add more nodes to your deployment.
Next, you can choose between semisynchronous and asynchronous replication. Semisynchronous replication guarantees at least one slave has received all the data that the master has committed, ensuring that the failover to the right slave is lossless. In asynchronous replication, each slave syncs asynchronously to the master so failover from master to slave may result in failover to a server that is not fully synced up to the current master.
Lastly, customize the DigitalOcean data center locations you wish to use for your slave nodes. Once you’re done, click next.
[clickToTweet tweet=”How To Set Up MySQL on DigitalOcean | @scalegridio #digitalocean #mysql #mysqldatabase #developer” quote=”How To Set Up MySQL on DigitalOcean”]
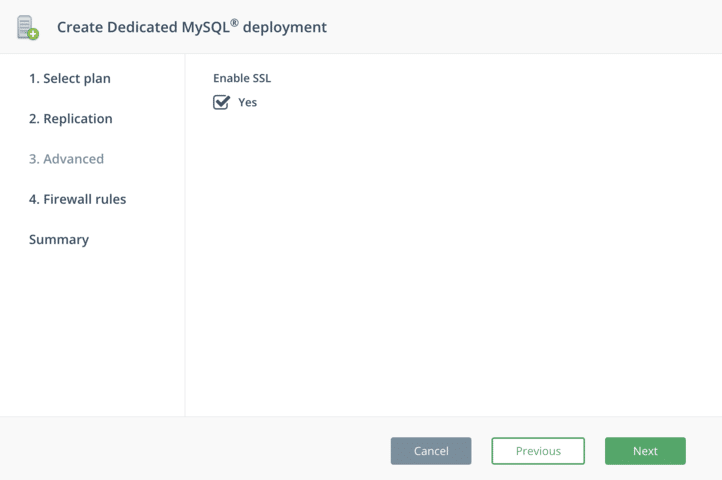
Step 3. Enable SSL
In step 3, you can enable SSL for your deployment. By default, MySQL server always installs and enables SSL configuration, but it’s not enforced that clients connect using SSL. Clients can choose to connect with or without SSL as the server allows both types of connections. Learn more about configuring and managing SSL in this MySQL tutorial.
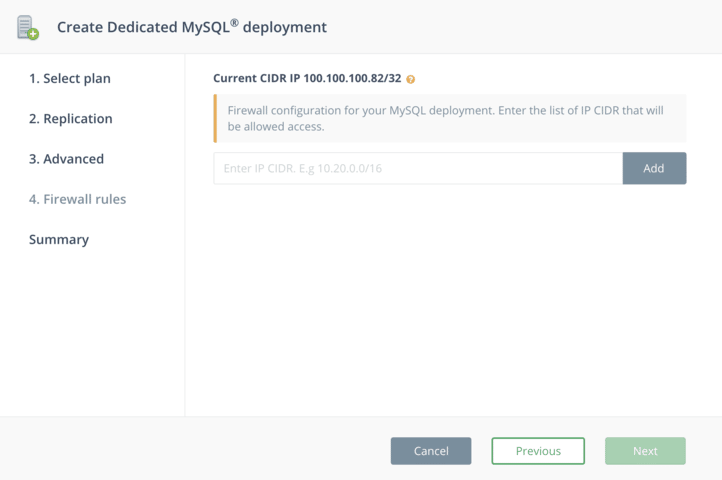
Step 4. Configure Firewalls
In the last step of the cluster creation process, enter at least one IP CIDR that will be allowed access to your MySQL deployment to set up your firewall rule. You can find your current IP CIDR at the top of the page. These can be customized later at both the cluster-level and account-level. Once you’ve entered it, click Add. Enter all the IP CIDRs you’d like, and then click next.
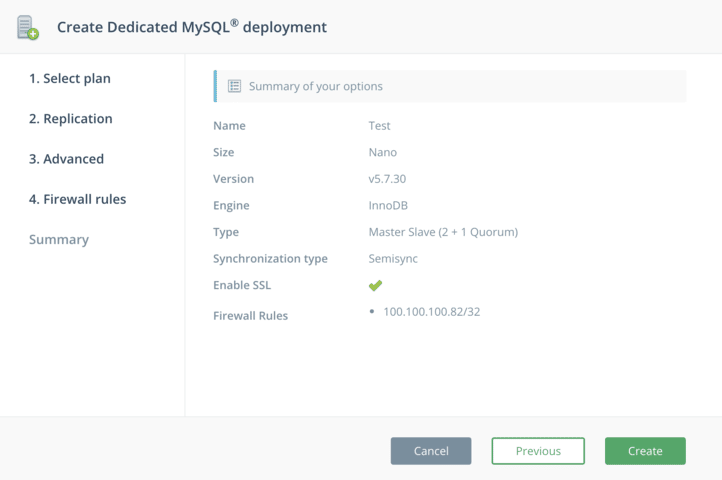
Step 5. Review & Create
The last page provides a short summary of your new MySQL DigitalOcean cluster. Review all of the details and click the Previous button to go back to an earlier step and modify your configurations. Once you’re ready, click Create to spin up your cluster.
And that’s it! Your deployment is now being provisioned! This takes about 15 minutes, so while you wait, you can familiarize yourself with the management tools for MySQL in the console – backups, restores, scaling, alerts, query analysis, etc.
Connect & Migrate
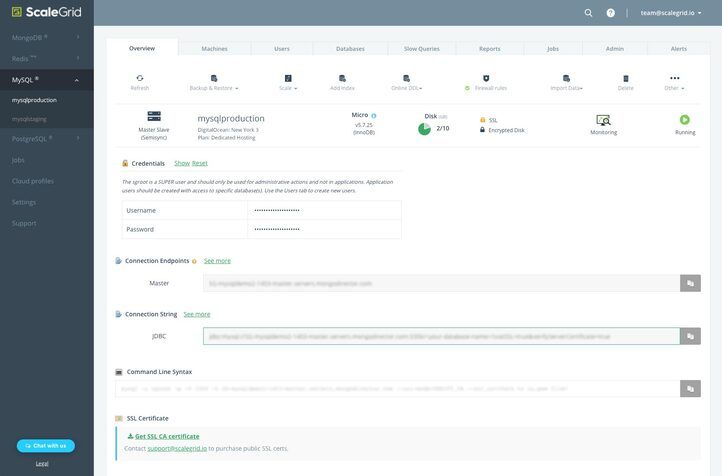
Once the cluster status changes from “Creating” to “Running”, you can connect your deployment. There are a couple different ways to do this – through your connection string to your app, through the command line, through WordPress, through MySQL Workbench or other popular GUI tools. All of your connection details are available in the lower half of the Overview tab of your cluster details page.
Visit the top tabs to create a MySQL database and create a MySQL database user. These can be accessed and managed anytime from the ScaleGrid console.
Migrate your existing MySQL installation in minutes
Migrating is also an automated process that requires just a few details from your existing deployment. Click the Import Data button on your Overview tab, and enter your Server Name, Port, Database Name(s), Username and Password. Check out our MySQL Migrations doc for more detail, and additional migration options.
Running your MySQL Server on DigitalOcean
Once you’re up and running, your MySQL deployment can virtually operate on auto-pilot. Since ScaleGrid is a fully managed service, we handle all of your day-to-day administration and maintenance of your MySQL databases, so you can focus on building your app. If anything should arise that requires your attention, such as running low on disk space, we’ll send you a notification so you can login and see if you’re ready to scale up your cluster.
With our different support plans, you can also connect with our MySQL experts anytime through our 24/7 support to help you set up and troubleshoot your deployment.