PostgreSQL® is a widely-used, enterprise-grade, and open-source relational database management system and is the fourth most popular database in the world according to DB-Engines. It is an RDBMS that is rapidly growing within the developer community. DigitalOcean, a fast-growing cloud provider that’s increasing in popularity amongst developers and companies, is a great host to consider for your PostgreSQL deployments. In this post, we will show you how to easily deploy PostgreSQL on DigitalOcean with ScaleGrid’s dedicated hosting in a few easy steps.
Setting Up Your DigitalOcean PostgreSQL Deployment
In this tutorial, we use ScaleGrid’s fully managed PostgreSQL hosting service on DigitalOcean. With the ScaleGrid solution, you get enterprise-grade features and free support, all included in one package. You will be able to utilize our full support for PostgreSQL extensions among many other things. You can get a full comparison of our features against other competitors on our PostgreSQL comparison page.
After just a few minutes of customizing your deployment configuration, the creation process starts, and once your deployment is up and running, all you need to do is connect to your application.
To get started, sign up for an account in our console, and without further ado, let’s get right into it.
Step 1. Enter PostgreSQL Deployment Details
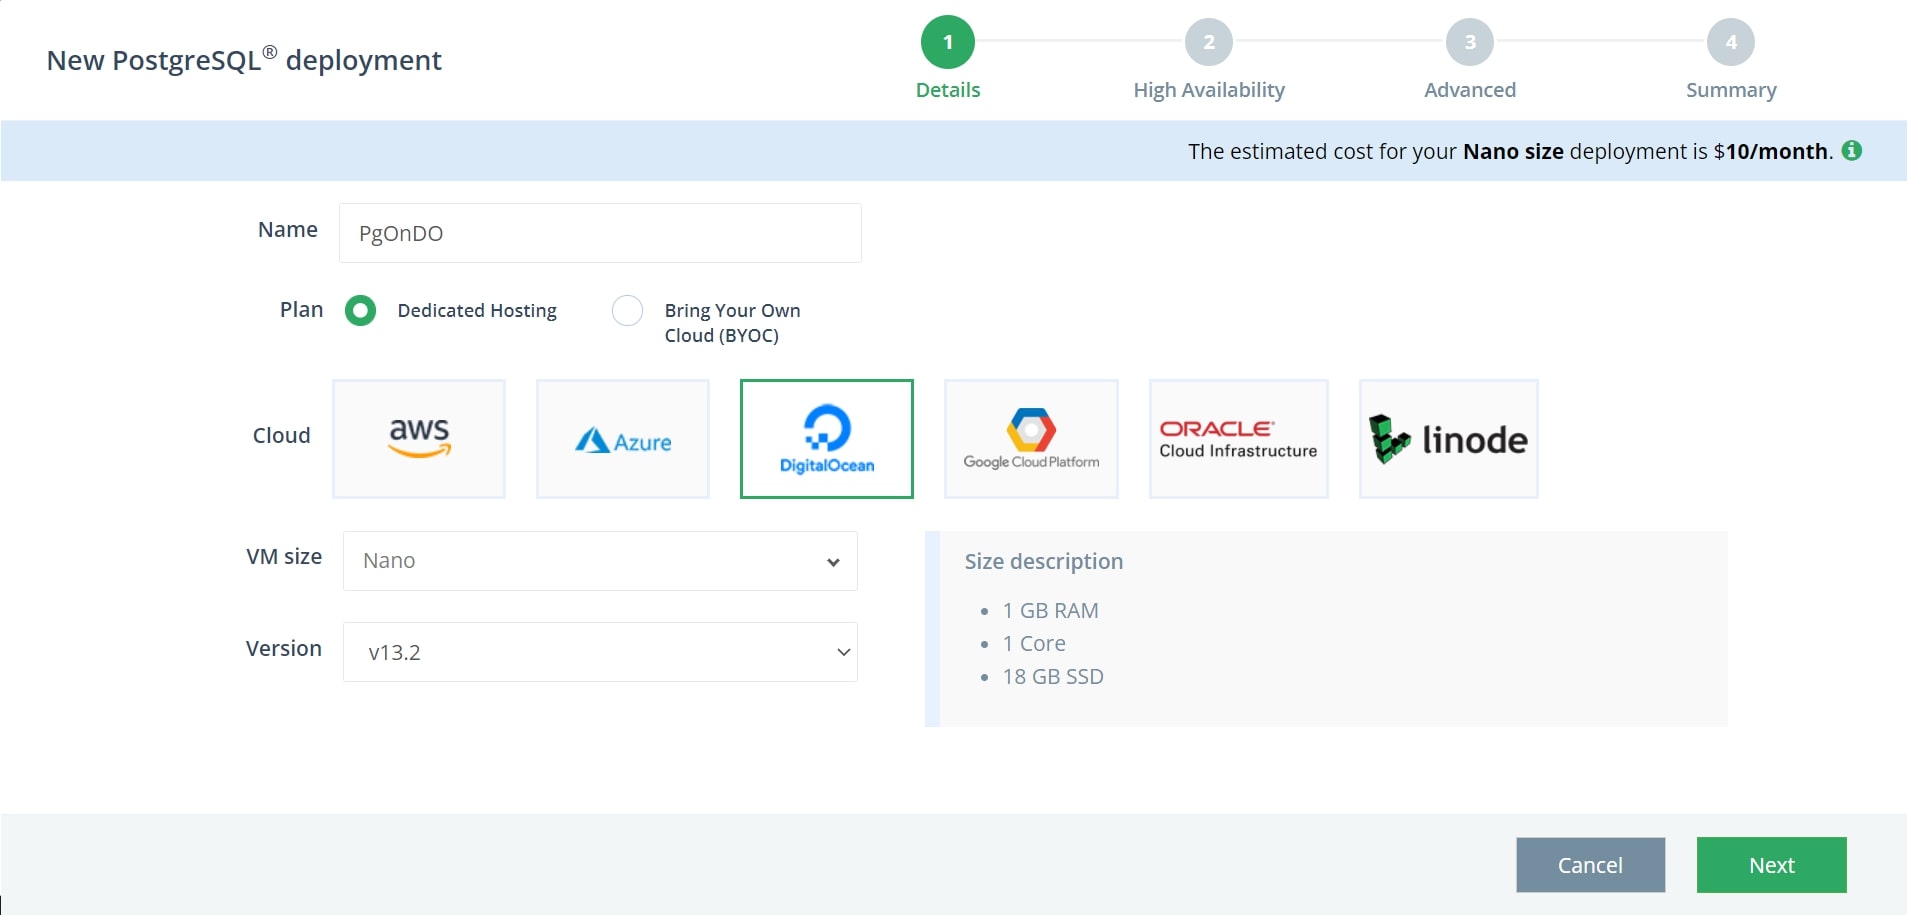
When you create a new PostgreSQL deployment, the creation wizard will open. To start off with, you can customize some of the basic details of your deployment such as name, size and version. Enter a name for your deployment, remember to use alphanumerics and a unique, descriptive name that is easily recognizable later on.
Next, select Dedicated Hosting and DigitalOcean as your cloud. Then select your VM size as well as your version of choice (all major versions are supported). In this example, we selected a Nano size deployment on PostgreSQL version 13.2. To the right, you can see a size description of your selected VM size. To continue, click Next.
Step 2. High Availability
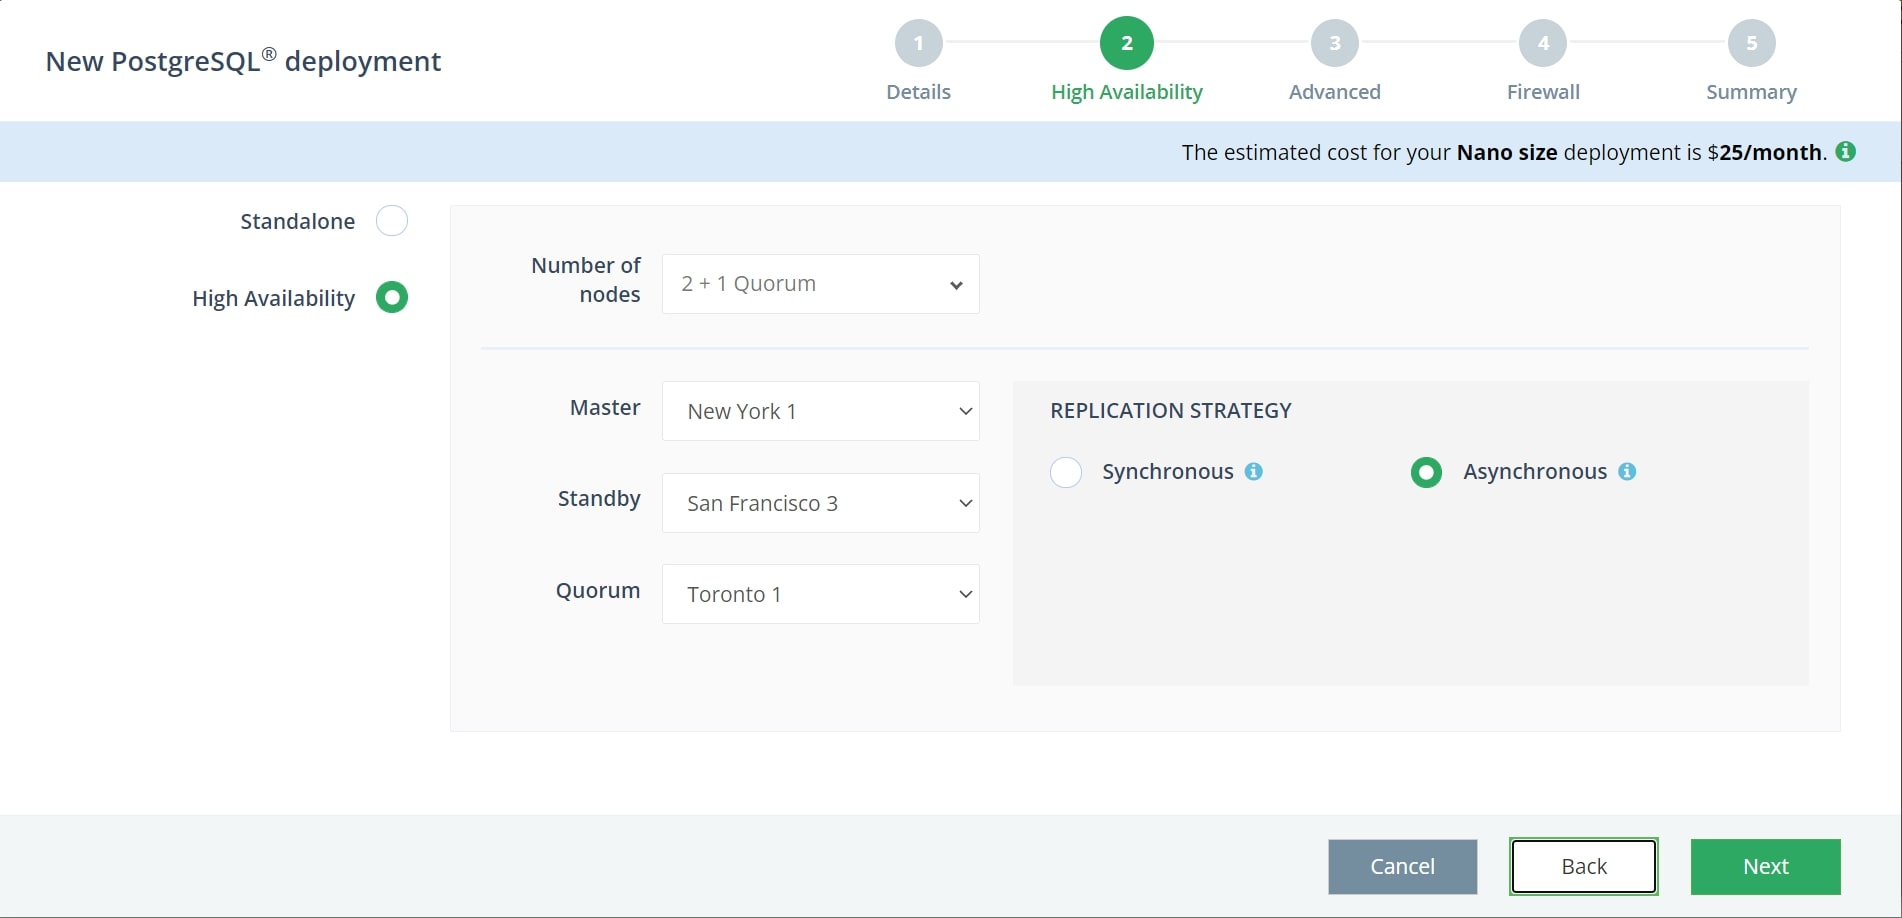
In the second step, you will have the choice of either setting up a standalone deployment, or a PostgreSQL DigitalOcean master-standby replicated high availability deployment. You might want to consider a high availability setup if you need your application and database to stay online in case of the event that your DigitalOcean data center region goes down. DigitalOcean is generally a highly reliable and stable cloud provider with 99.99% uptime, however, there is always a risk that a data center inevitably goes down. Having replication set up to additional data center regions can potentially save you and your users a massive headache as well as minimize the risk of data loss and downtime.
If you’d rather run a standalone deployment, simply select that option and your cloud region of choice, then click next to move onto step 3.
Please note that high availability is only available for paid accounts. A trial account will be unable to deploy a replica set.
For high availability on your PostgreSQL deployment, there are a few customization options for the master-standby setup. Your first option is the number of nodes, either 2 + 1 quorum or 3 nodes. While both options offer high availability, with the 2 + 1 quorum setup, you will only have 2 data-bearing nodes, as the quorum node serves as a decision-maker in the case of a failover event. To further customize the number of nodes, you can contact our support team, they can assist you in adding more nodes to your deployment.
You can then select which regions you want your nodes to reside in. To ensure high availability, it is recommended to select different regions for each node.
Lastly, you can choose between either synchronous and asynchronous replication strategies. The difference between the two is that with synchronous replication, all changes made in a transaction have been transferred to all the synchronous standby servers. However, with asynchronous replication, changes are propagated asynchronously to other standby servers. In case of a failover to a standby server, it might not yet have all committed transactions.
Once you have selected your preferred settings, click Next to continue.
Step 3. Enable SSL & PgBouncer
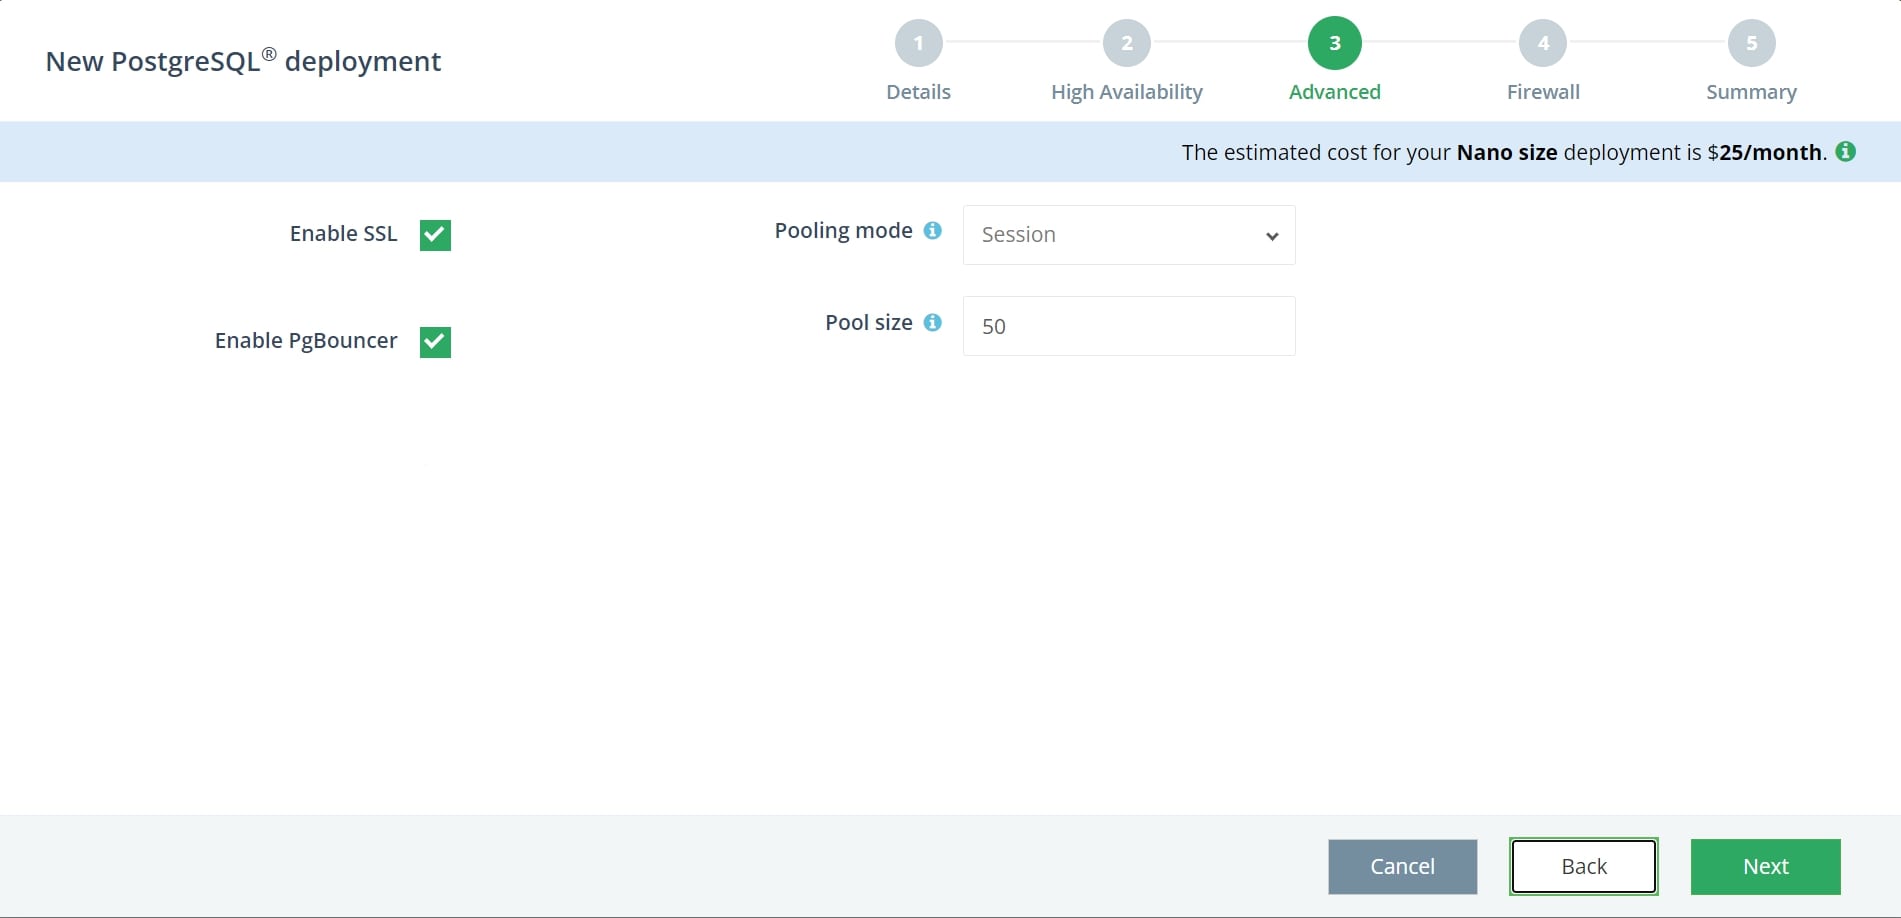
In step three of the setup process, you can enable SSL and PgBouncer.
Enabling SSL allows encryption in transit of your data.
PgBouncer is built into our management platform. With PgBouncer enabled, it will allow you to efficiently manage your PostgreSQL connections. You can read more about connection pooling for PostgreSQL in our blog post about the pros and cons of connection pooling.
If you decide to enable PgBouncer for your PostgreSQL on DigitalOcean deployment, you will be met with two additional options.
- Pooling Mode: This determines how soon connections return to the pool. Please be aware some Postgres features are not supported in Transaction and Statement modes.
- Pool Size: This determines the maximum number of cached connections per pool (i.e. per user + database combination).
We have a short guide on how to manage PgBouncer in our help documentation. After making your selections, press Next to go on to the next step.
Step 4. Configuring Firewall
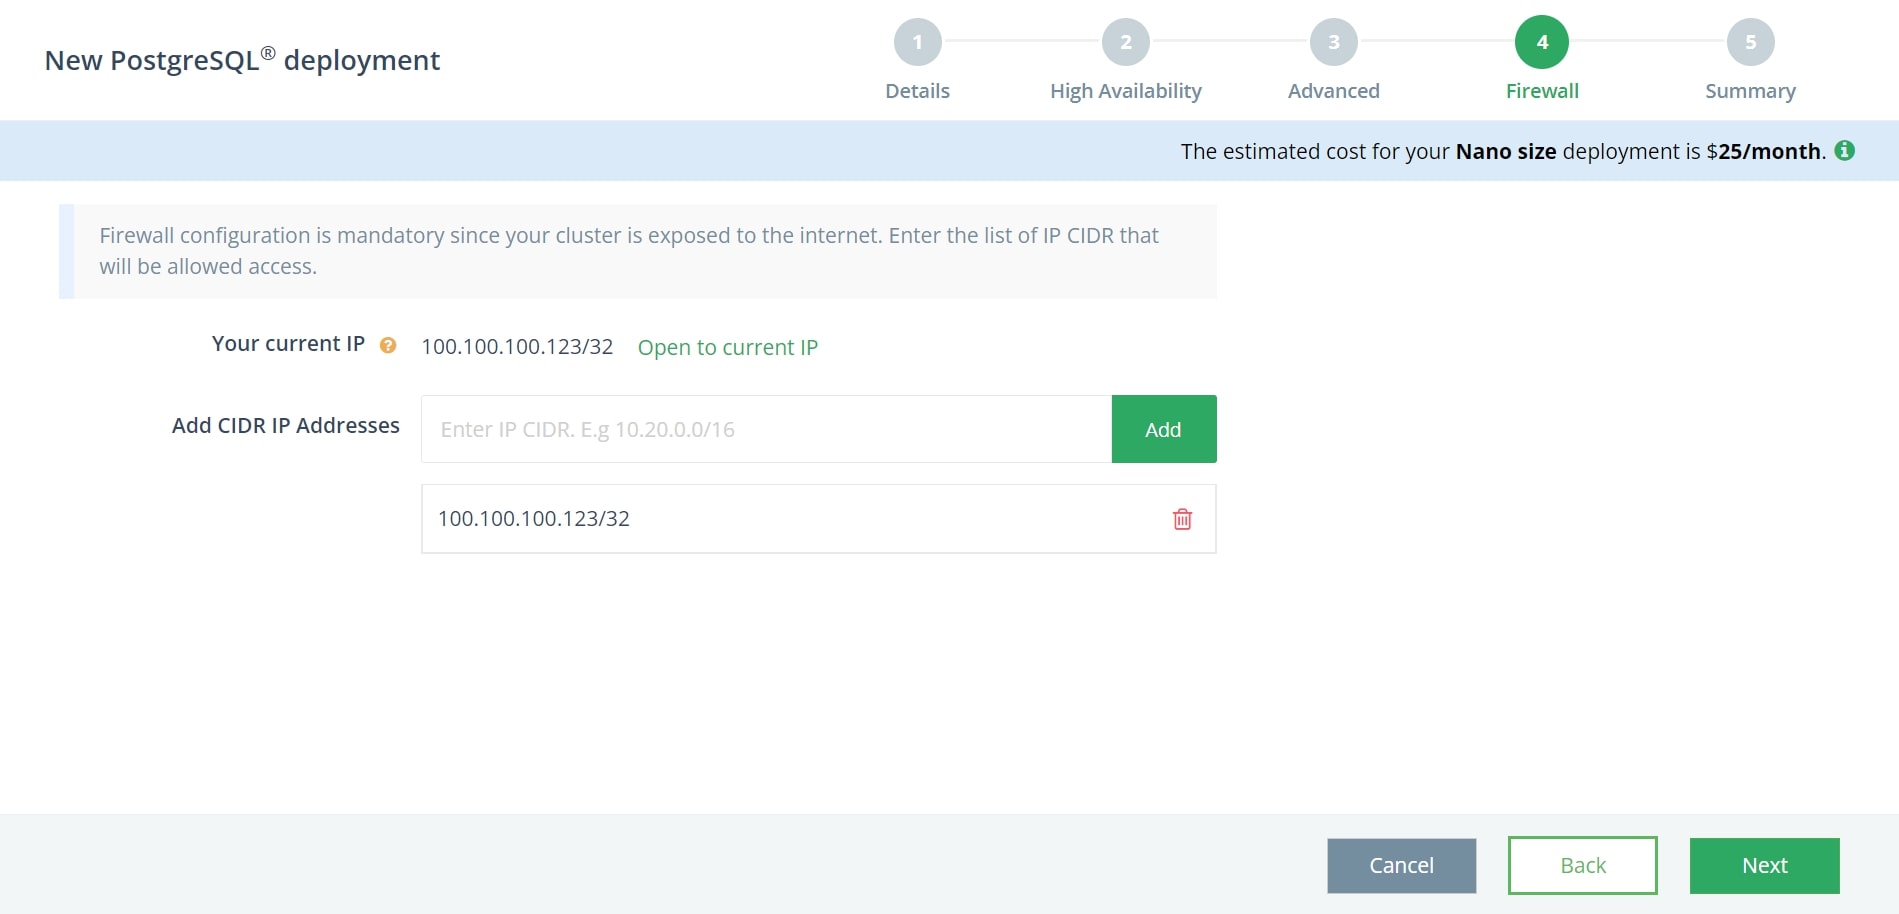
In step 4 of the PostgreSQL creation process, you will be prompted to enter at least one IP CIDR that will be able to access your PostgreSQL deployment. Your current IP will be shown at the top of the window, simply press “Open to current IP” if you want your current IP CIDR to be allowed access. These firewall settings can be customized later at both account and deployment levels.
After this, enter any other IP CIDRs that you would like to give access to, then click Next.
Step 5. Review & Create
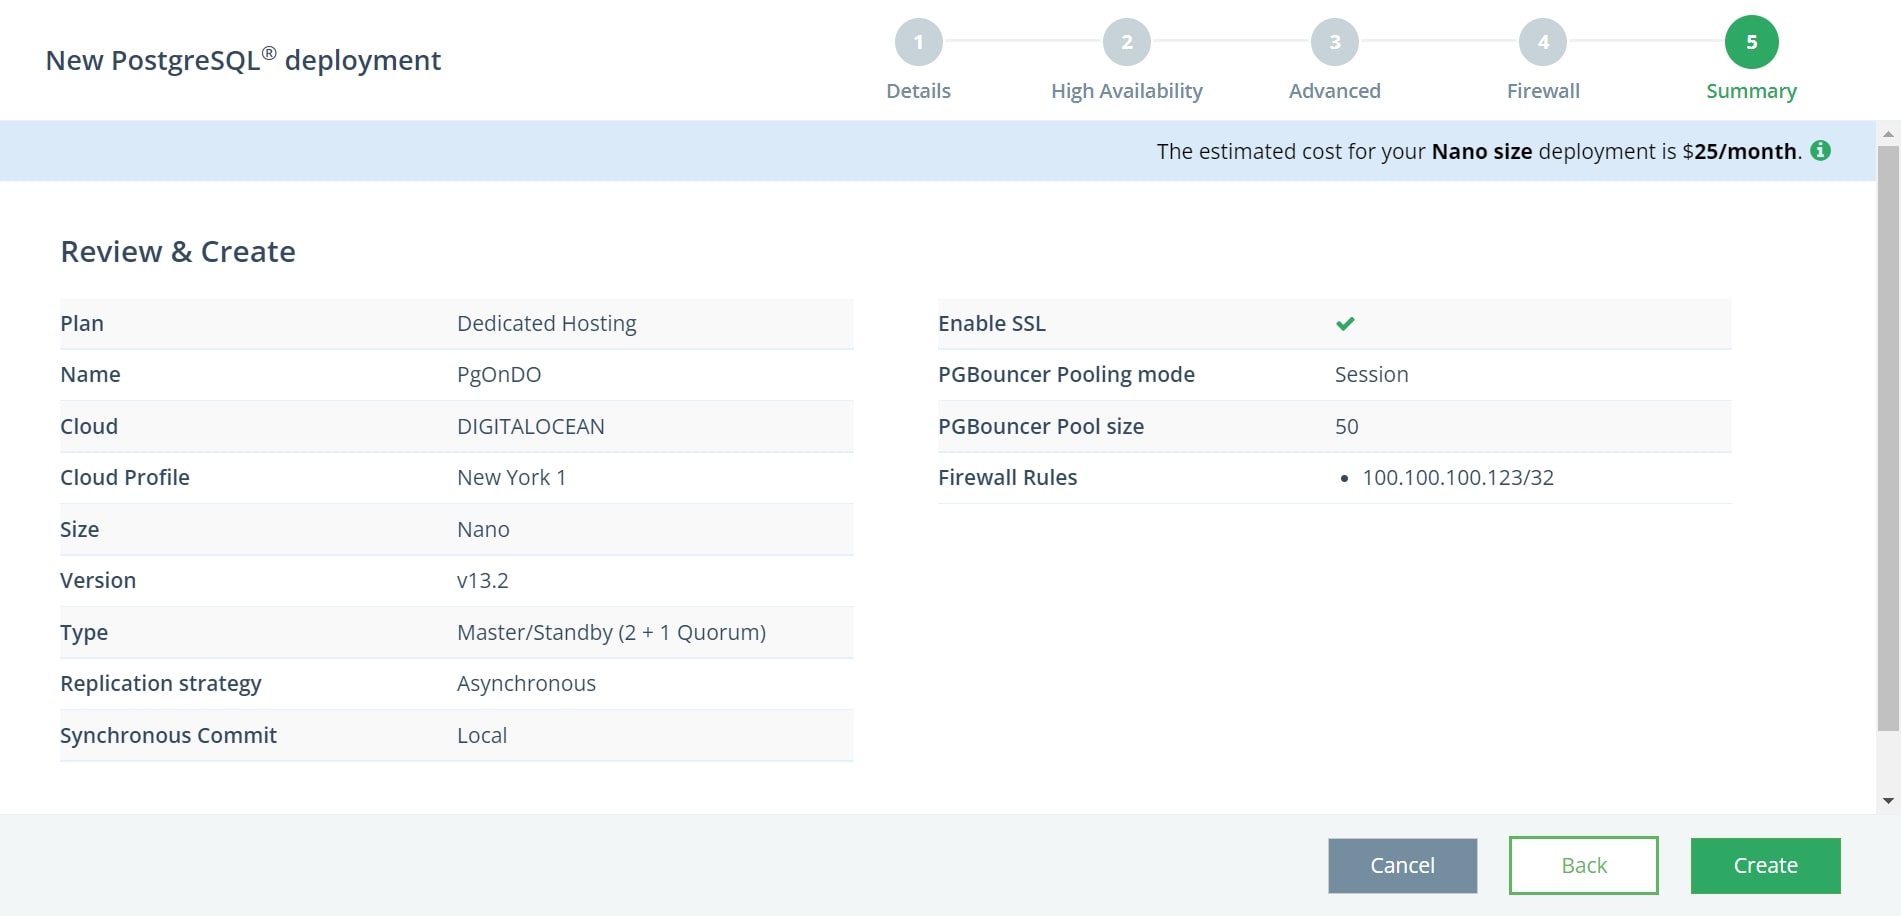
On the last page of the creation process, you will see a summary of your new PostgreSQL DigitalOcean deployment. Make sure that everything looks correct, you can press Back if you need to go back to an earlier step and make any necessary changes. Once you’re ready, click Create to spin up your new deployment.
That’s all there is to it! Your deployment is now being provisioned, this usually takes about 15 minutes. While you’re waiting, feel free to explore the different management tools available in our PostgreSQL console – backups, restores, scaling, alerts, query analysis, etc.
Step 6. Connect & Migrate
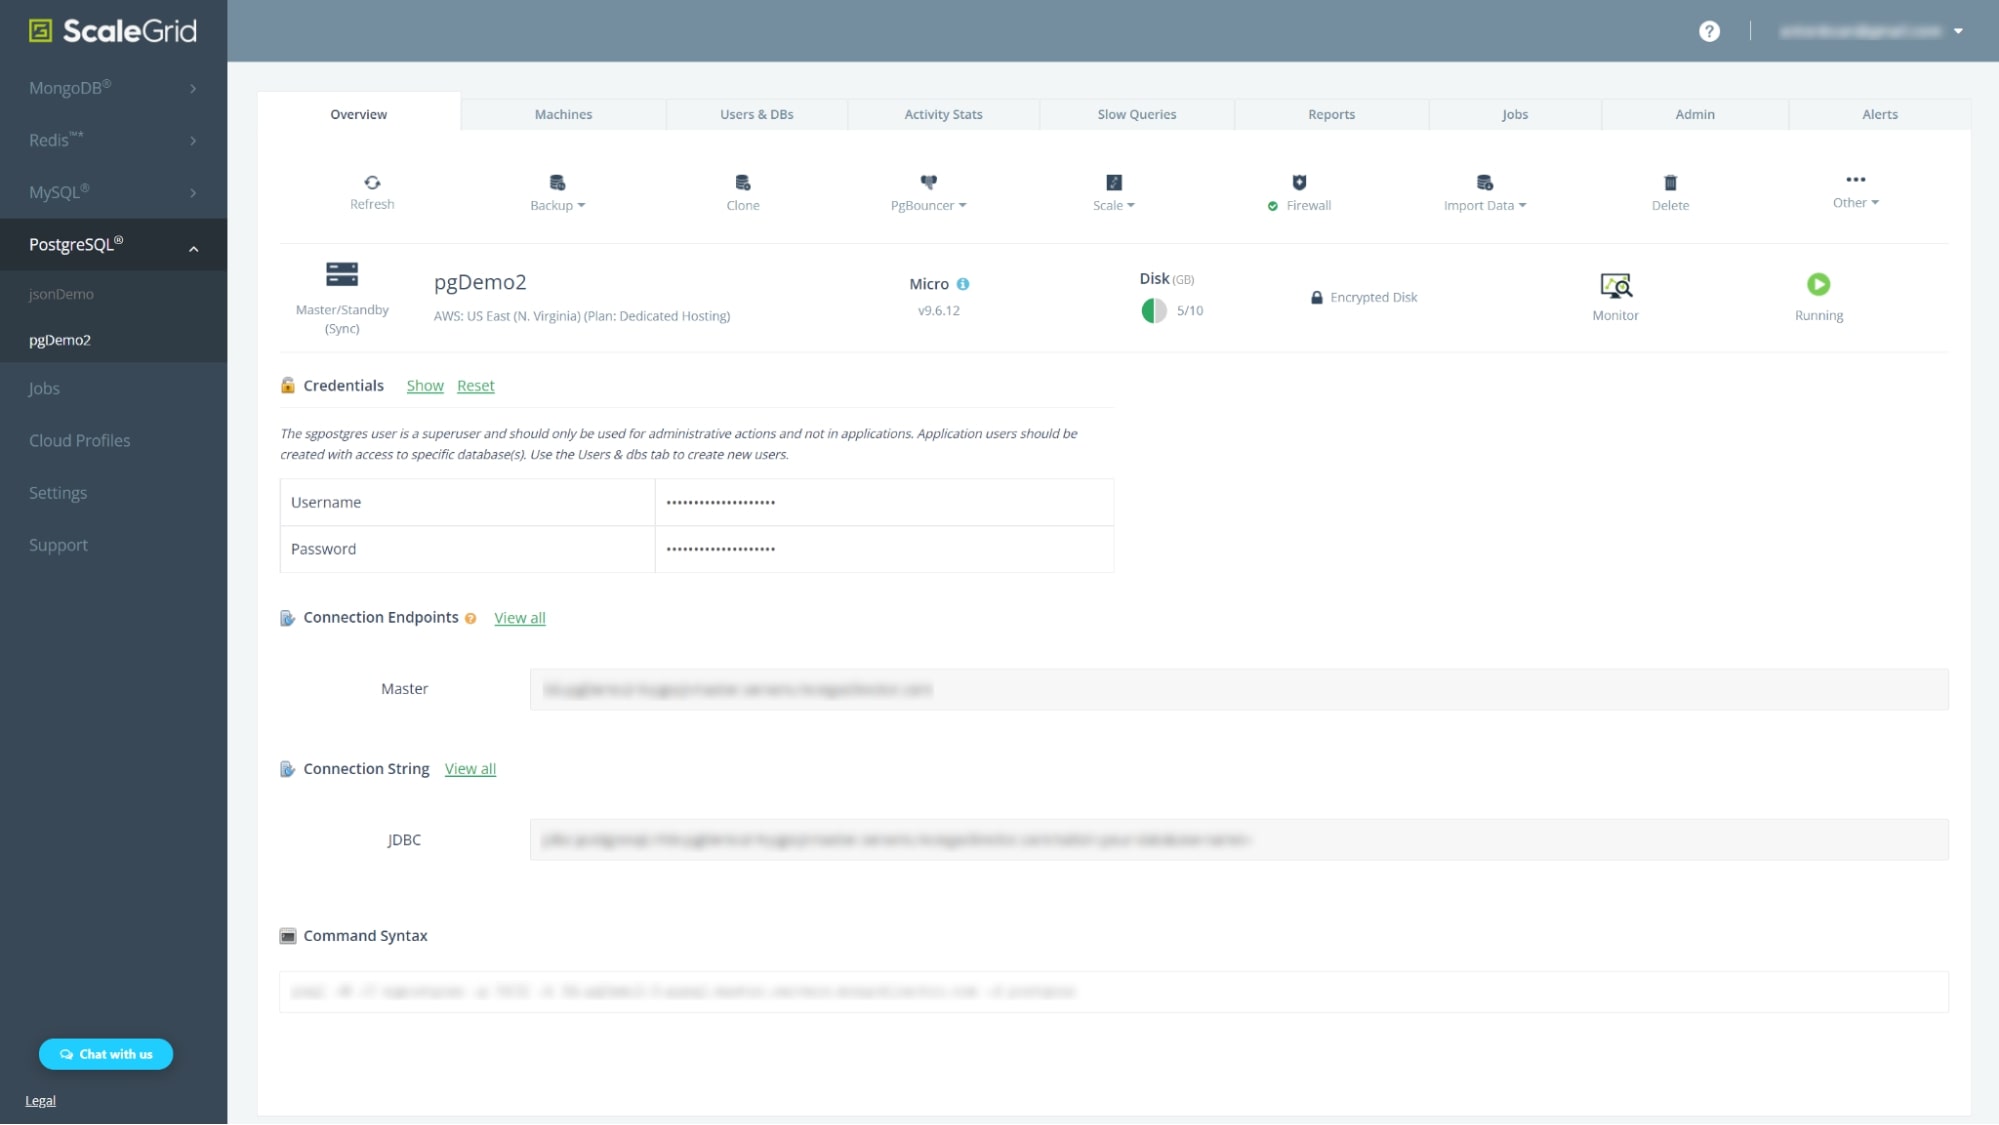
Once your deployment has changed from “Creating” to “Running”, you will be able to connect to your deployment on DigitalOcean. There are many different ways to accomplish this – through the connection string provided in the ScaleGrid console, through the command line or popular PostgreSQL GUI tools. All your necessary connection details can be found in the lower half of the Overview tab of your deployment details page.
You can access and manage your PostgreSQL databases and users at any time through the different tabs at the top of the console page.
Migrating is also an automated process that requires just a few details from your existing deployment. Click the Import Data button on your Overview tab, and enter your Server Name, Port, Database Name(s), Username and Password. Check out our PostgreSQL Migrations doc for more detail, and additional migration options.
Running on DigitalOcean
Once everything is up and running, your deployment on DigitalOcean virtually operates automatically. As our service is fully managed, you can let us handle all of the daily PostgreSQL management and administration tasks, while you focus on building and improving your application. If there is anything that needs your attention, we will send you a notification so you can log in and see if you need to scale up your cluster.
Read also: How to install PostgreSQL on Ubuntu 20.04